There might be situations you may want to change your web hosting from one company to another company. It may be due to you cannot afford the annual cost or may be due to any technical problems.
In any way you want to change your hosting provider. So in this tutorial I will show you all the necessary steps you need to do to migrate to another hosting provider.
The reason for this post is that I recently moved this WordPress blog from Godaddy to Bluehost. As before I thought moving my wordpress site to another hosting provider will be a complicated process. But when I completed it, I found its pretty simple process everyone can do easily. During the migration process I made a short note about all the steps, and here i am showing it to you step by step so that everyone can follow.
Here you will see how to move a WordPress site from Godaddy to Bluehost using cpanel Manually. In other way a tutorial to migrate wordpress blog to new hosting without any plugins.
If your WordPress blog is hosted in different hosting provider that running cpanel, the process should be the same as provided below. For example, moving WordPress blog from Godaddy to Hostgator or moving WordPress blog/website from Hostgator to Bluehost or Moving WordPress blog/Website from Bluehost to Godaddy … etc
All the steps are same, So I recommend you to focus on the steps I provided and follow it.
Move wordpress blog from godaddy to bluehost (Any to Any)
For making everything easy, I have divided the steps into 6 shorts parts. So you just follow it.
1. Backing up Your WordPress/ Website files from old hosting provider.
2. Backing up your sql database
3. Change DNS Zones.
4. Upload WordPress files to pubic_html of New Hosting service
5. Import database to new hosting service
6. Edit wp-config files.
Ok, thats all the steps. Lets starts the procedure by assuming you have a domain www.abc.com registered in godaddy and want to move from Godaddy hosting to bluehost hosting.
1) How to Backup WordPress files from Godaddy (Old Host)
>>Login to your cpanel(godaddy) by directing abc.com/cpanel
>>Click on File Manager, In this page you may see many folders and files. Look for public_html folder and open it. Here is all your necessary wordpress files are located.
>>Select all the files and click on compress option from the top options panel. ( these files includes wp-content, wp-config, wp-admin, many php files and more). Use Zip archive and note the target path of zip file.
>> Click on compress files
>> Now your wordpress files will be zipped in to the target location. It may be 50MB, 100MB or any size depending upon your number of wordpress size.
>> After zipping, download it to your computer.
2) How to Backup SQL Database using phpMyAdmin
>> From your Godaddy cpanel under Database section, Click on phpMyAdmin
>>From this panel you will see the database names. Expand it and Click on your database. You will see many tables appearing in the window. (like comments, posts, links, users etc)
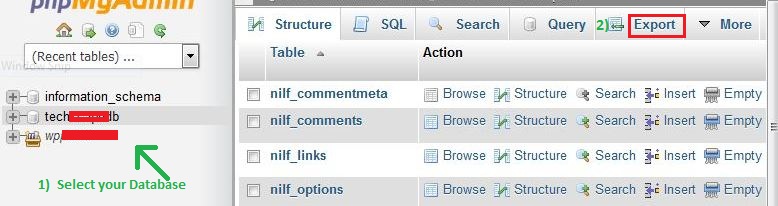
>> From the top menu click on export.
>> Select export method as Quick
>>Set Format as SQL.
>> Click on Go.
>> Now your sql database of old hosting will be downloaded. (may be less than 1MB)
3) How to Change DNS Record when moving WordPress to Another Hosting Account
>> Login to Domain account ( Where your domain name is registered)
>>Under Domain Manager, Click on the gear icon of your domain name and select Manage DNS.
>> Nowreplace your new Name Server with the existing one. Your new Name Server (NS Record) will look like NS1.BLUEHOST.COM, NS2.BLUEHOST.COM. You will get this NS record when purchasing hosting space.
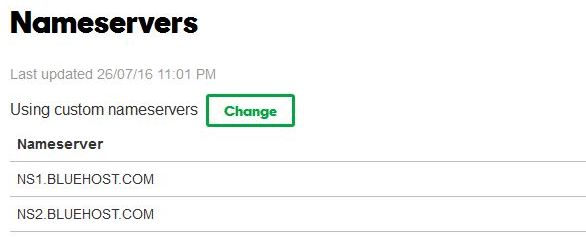
>>Save the changes
Now your website will be pointing to bluehost. ( it may take upto 48 hours for complete propagation)
4) Uploading Old WordPress files to New Host Manually (Bluehost)
As you have downloaded the zip file from old hosting, You are going to add it to Bluehost.
>>Login to Bluehost Hosting
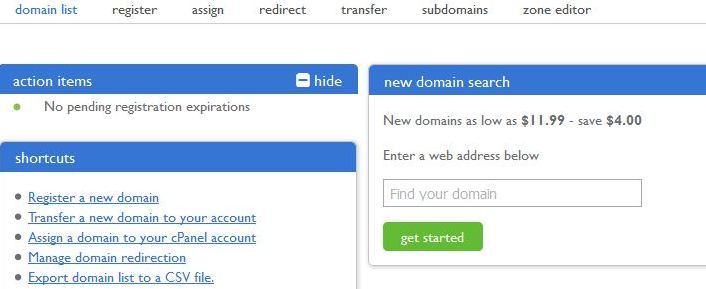
>>On your control panel, Click on Domain >>Domain List.
>> Under shortcuts tab, select “Assign a domain to your Cpanel Account“.
>> Now you will have to complete 4 process to finish the domain setup
a)Enter Your Domain in the appropriate field ie abc.com. Use the second option if your domain is registered with another account
b) You have to do nothing here. Because you have already verified ownership by entering bluehosts Name Server (NS) record in your Godaddys (where your domain registered) Zone record. If not, name server record will be shown here, and put it in GoDaddys zone record (step 3).
c) Choose Addon Domain
d) Choose a directory to save all your domain files. eg Public_html/MyDomainName
>> Finally Click on Assign Domain.
Check the folder by locating the path using file manager. This is the place where we want to upload the backed up files from godaddy.
>> Navigate to Public_html/MyDomainName using file manager. Then upload the zip file to MyDomainName folder.
>> Extract the zip files.
NB: Make sure that the files such as wp-admin, wp-content etc are located directly inside the public_html/MyDomainName, and not in any sub folder. (If not cut and paste everything to MyDomainName).
Read Also: Add A Sticky/Fixed Widget in Sidebar WordPress
5). How to Import SQL Database to New Hosting Account
>>Sign in to your Bluehost hosting account.
>>From your cpanel, click on MySQL Databases.

Note : For the following steps you must note down the dbname, dbuser and password. You are going to use this in next step also.
>> ThenCreate a New Database, eg db1. Please note your prefix of database. (actually your DB_NAME will be prefix_db1)

>> Under MySQL Users sectionAdd a new user. eg user1 ( so actually DB_USER will be prefix_user1)
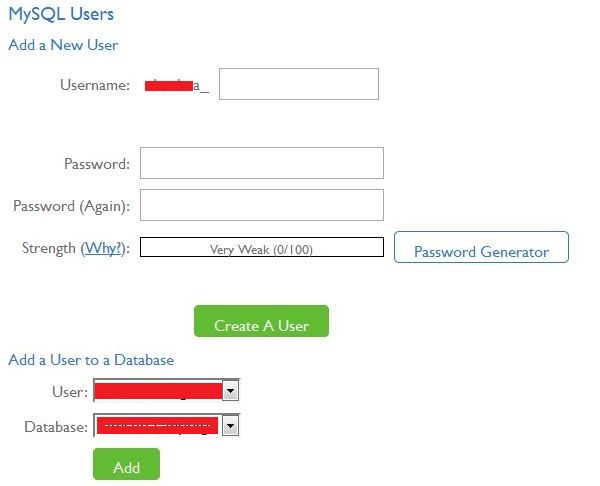
>> Enter a new Password for db user(DB_PASSWORD). Then click on Create a User
>> After that, Add the newly created user to the new database created. Set all the privileges.
Thats fine. Now you will see a new database account without any tables in phpMyAdmin panel.
>> Now navigate to phpMyAdmin from cpanel, and click on the newly created database name.( Now you will see no tables in the middle panel. Here you are going to import the database.
>> Click on import, and then choose the downloaded sql database file. Leave other options as it is and click Go button.
Great job! Now your sql database is updated. One more step ahead to complete migration.
6.) Edit Wp-Config.php file to add Database details using File Manager
>> Open file manager. And locate public_html/MyDomainName/wp-config.php
>>Then edit wp-config.php file using code editor. You have to change DB_NAME, DB_USER, DB_PASSWORD (in red color) with your details from step 5.
>>Finally save it.
Check it by logging in to wordpress dashboard. To save permalinks Go to settings>Permalinks and click “Save Changes.”
Congrats! Now you have successfully moved your WordPress website from godaddy to bluehost. If nothing appears try waiting for 48 hours (generally 1 hour) to complete the dns propagation.
Ok. Thats all about migrating your WordPress blog. If you facing any problems please comment below. I will try my best to solve your queries. Thank you.